Showing posts with label repurposing. Show all posts

Friday, February 1, 2013

Getting Organized: Sewing


As I've admitted, I'm a big remnant bin shopper. This leaves me with lots of random rolls of fabric. I can put them in a drawer and awkwardly sort through them once I've come up with a project, but I knew there was a better way. While cleaning up my closet I came across a shoe organizer I no longer have a need for. In all honesty, I have big feet and I can't fit all that many shoes in it anyways. 
So a method of fabric organization was born!
 
 
Depending on the thickness of the fabric, several rolls can fit in each slot.
 
 
It also makes it easy to see which fabrics would work well together. You could even keep the fabrics meant for specific projects together in their own pouches. Having them out and visible also keeps me thinking about what I can do with them, so hopefully I'll be encouraged to find some time to use them.

As you can see, I'm a fan of using what I already have laying around the house. I happen to have a bunch of pill organizers laying around. Seriously, my Grandmother was getting rid of several and my husband figured we could find a use for them. I mean, really, who couldn't use five pill holders? Well, they happen to make PERFECT bobbin holders!

 
Seriously, it is pretty similar to what they sell in the store for that.
 
Just a few simple things that can make a sewing area that much more enjoyable and productive!


Monday, January 7, 2013

Christmas Thank You Cards

'Tis the season for thank you notes!

The past two years I've turned our thank you cards into a fun project I can do with my daughter.  Last year was potato stamps, this year we reused some wrapping paper.  I saw a neat idea for cards using old wrapping paper here, but I knew it would be asking a bit much from a two year old, so we did our own version.

 
We started out with our old paper.  I gave Little Lady a pair of kid safe scissors and told her to cut away and also gave her the option to rip it up into little bits. 


She opted for the scissors, since they were a novelty.  In reality, I made most of the scraps. She was pretty into those scissors.


This is a really great project for getting some "destructive" energy out.  Let them rip up the paper to their hearts content!

 
Next, we grabbed some big index cards (5" x 8"), and folded them in half.

 
Then give the kiddos some glue sticks, or a bottle of glue and have them spread it all over the front of the card.  A glue stick is probably best, but I somehow couldn't find ours when we were doing this.

 
Have them pick out scraps to place on the card.  While they are doing this you can ask what colors are on the scrap of paper or what shapes - use it as a teaching/learning project too.

 
Some of the pieces they put on will overlap the edge, just trim along the edge once everything is dry.
 
 
You'll then have a bunch of cards to let dry.  Admitedly, she did eventually tire of putting the paper on and wanted to go back to cutting with the scissors, so I finished up the last couple.

 
While they dry, hop on your computer and print up a sheet with a bunch of "Thank You" on it, in whatever font you want.  You can also just hand write it too, whatever works for you.
Cut them out, again, have fun with it.  I obviously did the cutting, Little Lady isn't quite there yet, but if you have an older kid they can do this part too.
 
I then pulled out the Modge Podge and did a quick covering over the front, "unifying" the papers on the front and the "Thank You" tag. 
Kids can help out with that part too, but I did it after Little Lady was in bed.

 
There you go!  The finished project - you have a pretty easy kid craft and personalized thank you cards!  Just stick them in some 4.375 x 5.75 envelopes and mail them off! 
 
 After you write in them, of course.


Saturday, December 29, 2012

Getting Organized: Cork Board Calendar

 
There is so much to do and so much more I want to get done. Ever have that feeling? Trying to figure out how to keep it all organized, do the regular every day things that NEED to be done, remembering to account for the scheduled obligations and then fitting in those things you WANT to do can be tough. I'll end up with numerous to-do lists which get lost in the shuffle and then I'll end up setting a reminder for myself to make a to-do list.....telling myself to do a to-do. 
 
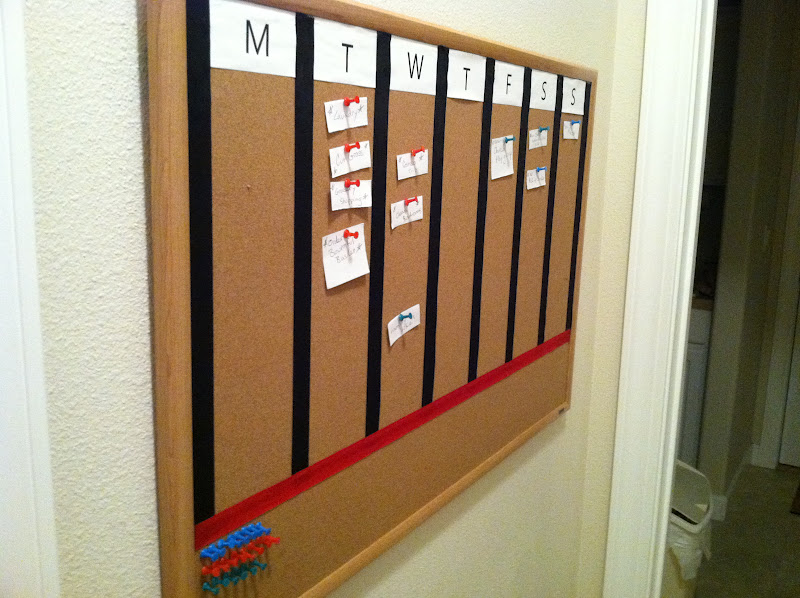
Well, we had a big cork board leftover from when I did home day care.  Hubs hung it on a leftover nail on the wall and it is in the perfect spot for him to see it when going to/coming from work and I will also see it numerous times through out the day. I figured I would get a bit crafty and make a cork board calendar to help us stay organized and all on the same page.....and I don't have to remind anyone of what we have going on.....he, I mean they, can just take a look and see what the weeks plans are.
 
So, let's make a cork board calendar!


I started out doing some measurements. Take the total width of the corkboard divided by seven, so each day will have a column. I printed up paper with a large letter for each day and then cut them to the appropriate width for each column.  I stapled down headers for each column first and then glued the lettered papers down on those.  In hind sight, I could have just glued the sheets with the letters directly onto the cork board, since the ribbon is glued directly onto it anyways. 


I then dug through stuff I had and found ribbons. I originally had plans to go get a nice shade of green or something but then reminded myself that I didn't want to spend money on this and I could find odds and ends to do it with at home. I encourage you to do the same.  After Christmas, you will hopefully have lots of that stuff sitting around!  Glue the ribbon down to form the columns.  I used my handy sewing ruler to keep the ribbons straight.


I then put a contrasting ribbon across the bottom to leave a section for tacks, and an envelope to hold the tabs with things that need to be done.


Ready to be filled up!


I've also got a little system for the pins. Red is for to-do items, like cutting the grass or grocery shopping - things that need to get done. Blue is for appointments, things that can't get rescheduled or we are obliged to do. Green is for the stuff we WANT to do, but that isn't a necessity. You've got to be flexible, so this helps us prioritize things and let us know what can be shifted around if need be. I also don't like seeing empty space, so I figure this helps me be more productive and will kind of challenge me to keep things up there. I also put a small envelope under the red ribbon that holds the little paper tabs to write tasks/events and one to hold tabs that will be reused.  I simply cut up pieces of paper to use for the tabs, nothing special.  You can also flip them over and write on the other side as well, so you don't have to cut as many.
 
Here is where we are going to take it to another level - at the bottom of each row, you can do some meal planning and post what the planned meal is for each day!  Too much?  Thought I'd put it out there......do with that idea what you wish.
 
While this does take some effort to keep up with, it has been surprisingly effective.  I knew it was a keeper when Hubs said "Ugh, it's Thursday.  I have to change the litter box." 
 
Hope this helps you too!